Upload your first source
Walk the New source wizard — name your source, upload a CSV or Parquet event log, map your columns, and set up sessions.
A source is one uploaded file of your product's event data — the raw record of what your users did. A project can hold many sources, and teams usually add separate ones for different time periods, individual research questions, or specific A/B tests. Every chart, cohort, and insight comes straight from your sources. This guide walks you through the New source wizard start to finish, from picking a file to watching the load land.
You'll do all of this from the Sources screen. Can't find it in the left sidebar? Your role can't upload — jump to Who can upload below.
Open the New source wizard
Head to Sources in the left sidebar and click + New source. If your project doesn't have any data yet, you'll land on the Connect your first source screen instead — click its dropzone or Browse files and the same wizard opens.
There are four steps: Source · Upload · Mapping · Sessions. Jump back and forth as much as you like until you hit submit.
Give the source a clear name a human would recognize — something like Mobile App Production or Web Events Staging. You'll see this name every time you pick a source later, so make it specific.
Then pick the file type that matches your export: CSV or Parquet. Parquet loads faster when your export is large and packed with JSON; CSV is fine for everything else.
Grab the event log you want to import. Cohortum reads the file to spot your columns and pull sample values — nothing gets imported yet. Before you pick, skim Supported formats and limits: a file that's too big or malformed is the usual reason a load fails.
Grabbed the wrong file? Hit Replace file to swap it right there in the wizard.
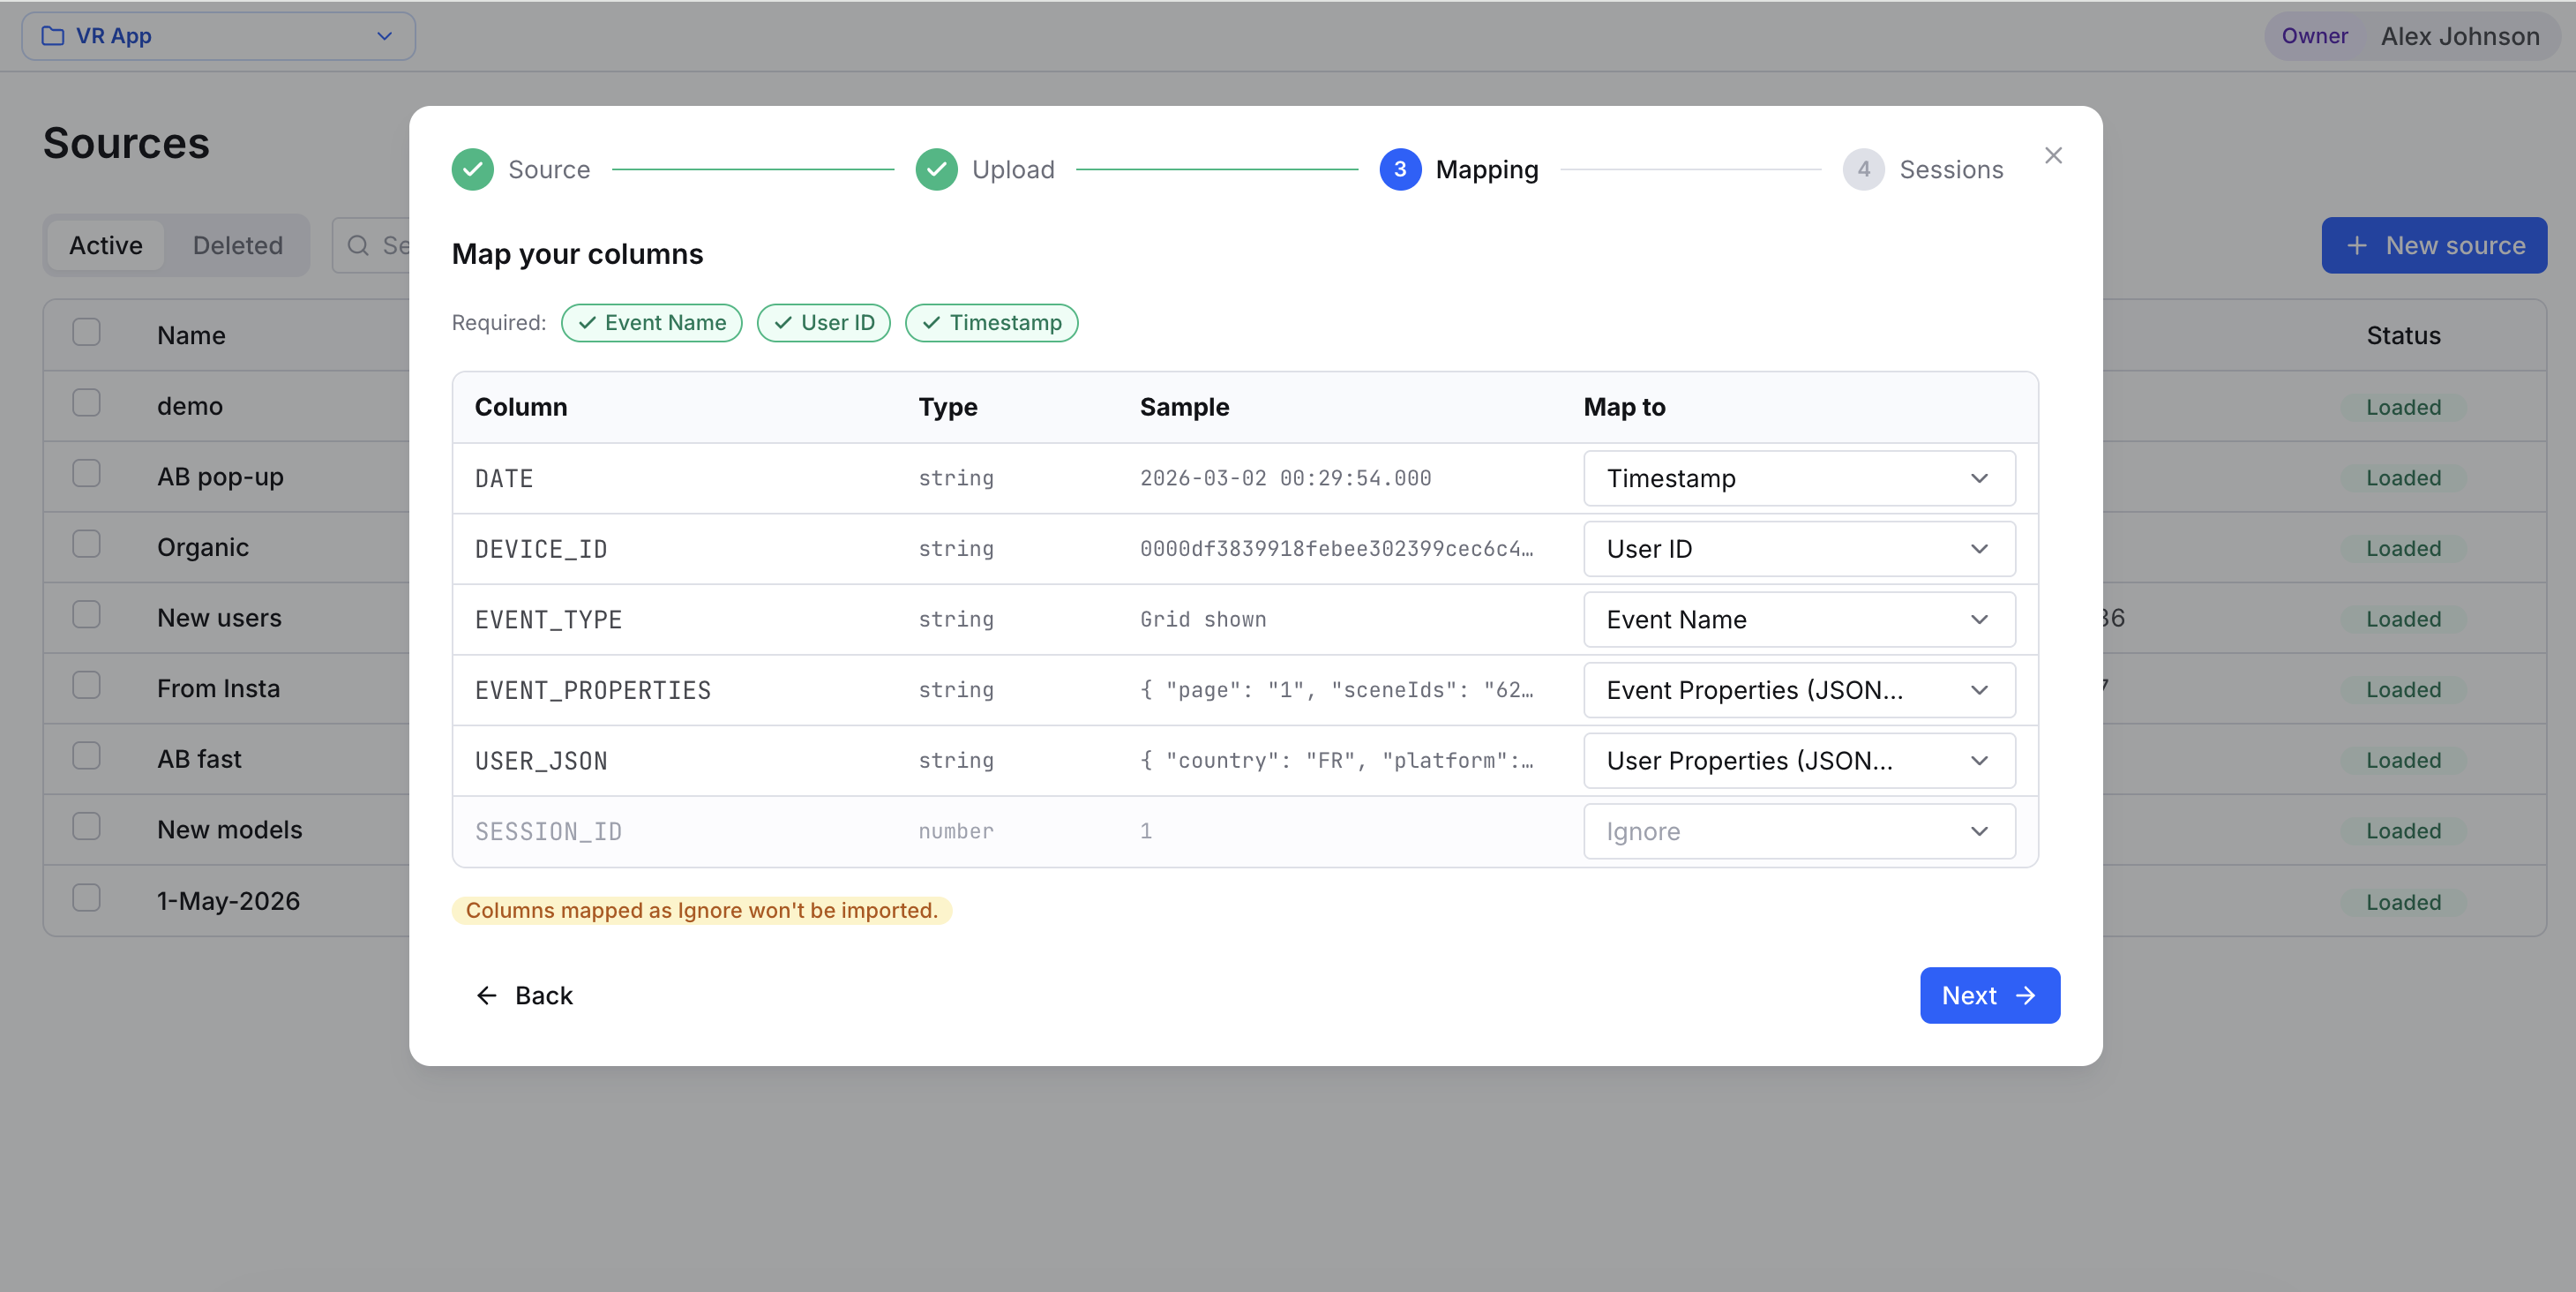
This is the step to slow down on. Cohortum shows you a Map your columns table with one row per column in your file: the Column, its detected Type, a Sample value, and a Map to dropdown.
Once your file is read, Cohortum takes a first pass at the mapping itself and pops a toast — "Auto-mapped N columns — review the mapping below." Take it as a rough draft: read every row and fix whatever it got wrong.
Tell Cohortum how to slice a user's events into sessions. Either let it build sessions from gaps in activity, or point it at a session column you already have. Full details in Configure sessions.
Hit submit and Cohortum confirms with "Source created — importing your file.", then kicks off the load.
Map your columns
Cohortum needs three things from every event before it can chart anything. They show up as required chips in the Mapping step, and you can't submit until each one is assigned exactly once:
- Event Name — what happened, e.g.
Video clickedorPage pagination clicked. - User ID — a stable identifier that ties events back to the same person across sessions.
- Timestamp — when the event happened.
Map-to options
Each column's Map to dropdown gives you six choices:
| Map to | What it does |
|---|---|
| Event Name | The event's name. Required. |
| User ID | The user identifier. Required. |
| Timestamp | When the event happened. Required — check the expected formats and timezone handling in Prepare your data. |
| User Properties (JSON string) | Attributes of the user (e.g. country, plan) for filtering and comparing. |
| Event Properties (JSON string) | Attributes of this event (e.g. button label, page number). |
| Ignore | Leave the column out of the import. |
Anything you mark Ignore never gets imported. If there's any chance you'll want to filter or compare on a column down the line, map it as a user or event property now — adding it back later means a fresh upload.
Your column mapping and session settings lock in the moment the source is created. You can look them up later on the source's Column mapping panel, but you can't edit them there. Need to change how columns map or how sessions get built? Delete the source and run New source again with the corrected mapping.
For more on shaping your data before you upload, see Prepare your data.
Configure sessions
The last step, Configure sessions, decides how Cohortum groups a user's events into visits. Sessions are what power the Sessions-level analysis and the Session btwn N and M filter control once you're working in an analysis.
You've got two options — and whenever you already track sessions, we recommend providing your own:
- Session column (recommended when you have one) — ship a session identifier in your export, switch off auto-generate, and point Cohortum at that Session column. Your own logs carry each user's full history, so session boundaries and the order they're numbered in match your definition exactly.
- Auto-generate sessions — turn this on and Cohortum starts a fresh session after a stretch of inactivity. Set the Session timeout (minutes) field, and a new session begins once the user goes that many minutes without doing anything.
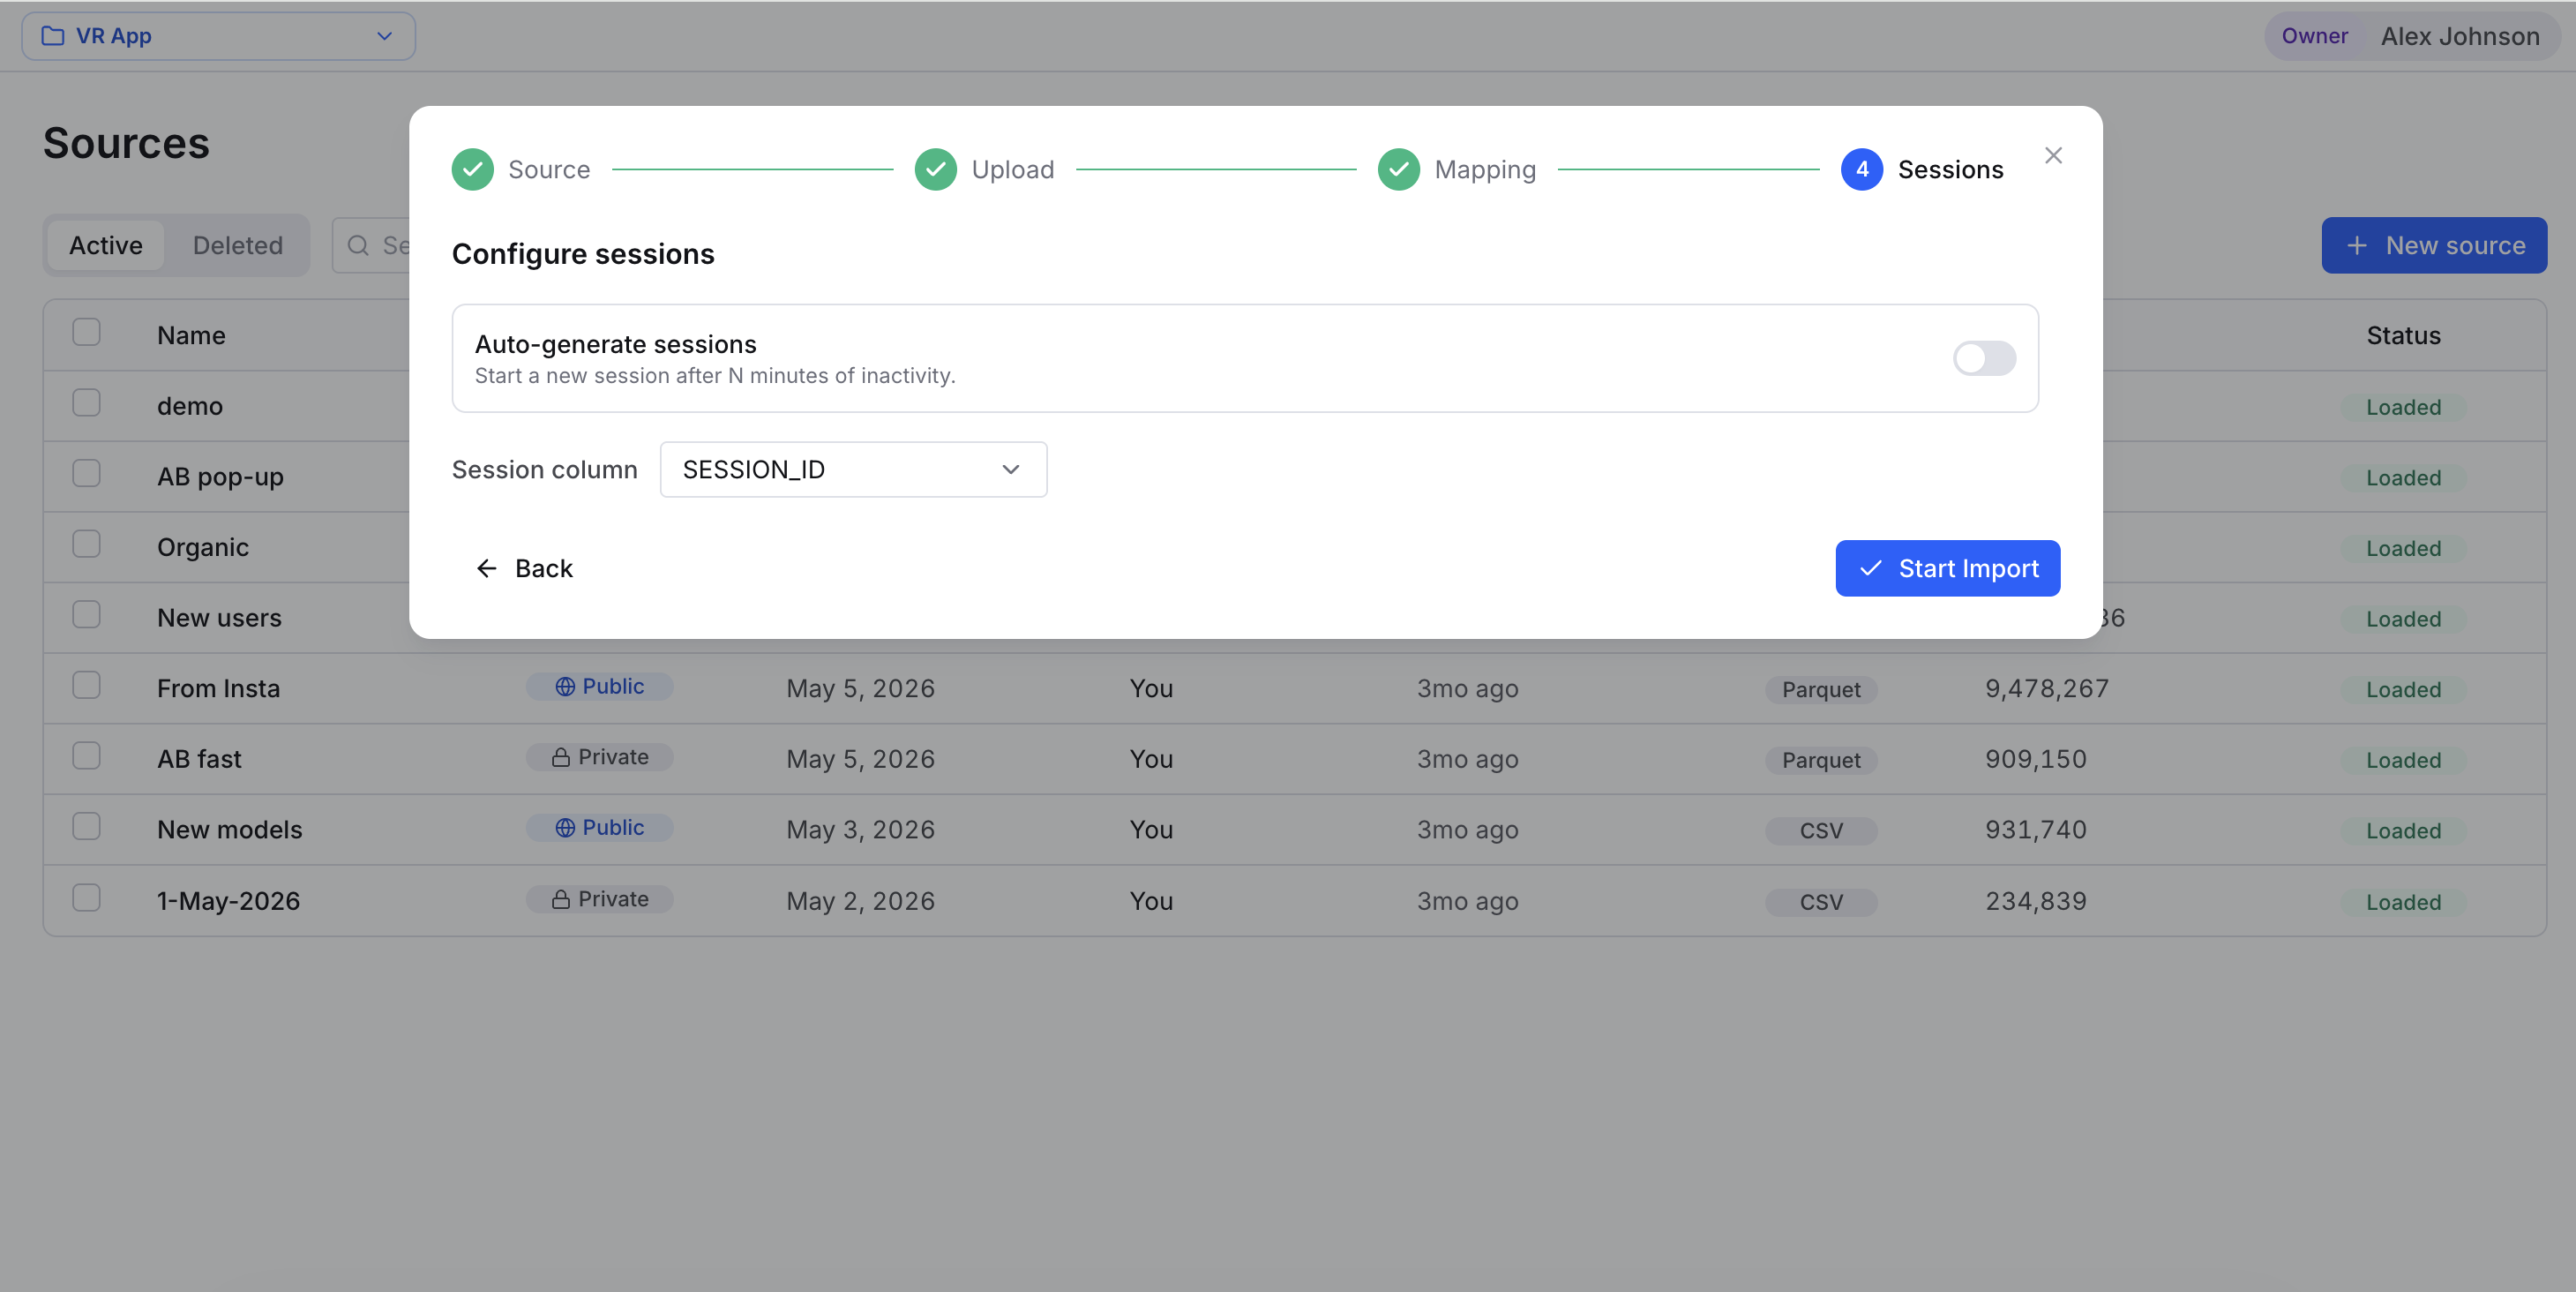
If you don't already track sessions, leave Auto-generate sessions on. A 30-minute timeout is a common default for web and mobile clickstream.
Watch the load finish
Submit, and your new source shows up in the Sources list with a status badge on its row. It says loading while the import runs, then flips to loaded when it's done (or empty / deleted). Expand the source to see its Loads history — load date, file, size, rows loaded, rows rejected, and a per-load Status. That per-load status is where you watch the play-by-play. Each load moves through:
- pending — queued and waiting to begin.
- parsing — reading your file and checking it holds together.
- transforming — building the events, sessions, and derived tables your charts come from.
- done — the load finished and the source is ready to analyze (or failed / cancelled).
Land on failed? Check that your required columns mapped cleanly and that the file actually matches the type you chose. A source's mapping is fixed once it's created, so you can't patch it in place — delete the failed load, and if the mapping itself was the problem, delete the source and run New source again with the corrected mapping.
Big files take a while, but you don't have to babysit the screen — the load keeps running in the background. As soon as it reads done, head into Events Analysis and start digging.
One source, one dataset
A source holds exactly one dataset. Once its file has loaded, that's it — you can't pour more data in. The Upload button goes dark, and there's no way to tack on another file. Got a newer or different export? Spin up a new source for it in the wizard.
The one exception is New upload. If a source never actually finished loading — it's still empty, or its load failed or got cancelled — you can attach a file to finish the job. New upload reuses that source's locked-in column mapping and session settings, so there's no Mapping or Sessions step, just the source and the file. The moment the source is loaded, the option disappears. See Sources and loads for the full story.
Who can upload sources
Whether you can upload comes down to your role. The Sources screen only shows up for people allowed to add data:
- Owner and Admin — can always upload.
- Creator — can upload only once a workspace admin flips on the Upload sources toggle for them.
- Viewer — can't upload.
Don't see Sources? Ask a workspace Owner or Admin to grant you upload access. And there's no "Member" role in Cohortum — the roles are Owner, Admin, Creator, and Viewer.
Next steps
Prepare your data
Shape your CSV or Parquet so it maps cleanly on the first try.
Sources and loads
Manage source status, load history, and column mapping.
Supported formats and limits
File types, column requirements, and size limits.
Events Analysis quickstart
Your load is done — start exploring your users' paths and behavior.